

When your water heater fails, when cold showers become the norm, and when hot water’s a distant memory, it’s time to act. You can troubleshoot common issues yourself, saving both time and money. From checking the power supply to inspecting the thermostat settings, there are practical steps you can take. Curious about the simple fixes and when to call in the experts? Let’s explore the best solutions for your water heater woes.
Check the Power Supply
Before diving into any repairs, it’s important to check the power supply to your water heater, as many issues stem from electrical problems.
First, verify that the unit is plugged in and that the outlet is functioning. If you’re dealing with an electric water heater, look for a tripped circuit breaker or blown fuse. Resetting the breaker or replacing the fuse can often solve the problem.
Next, inspect the power cord for any visible damage. If you notice fraying or cuts, replacing the cord might be necessary.
For gas water heaters, make sure the gas supply is on and the pilot light is lit. If it’s out, follow the manufacturer’s instructions to relight it safely. Additionally, ensuring the gas supply is on is crucial for the proper functioning of your water heater, as malfunctions can disrupt routines and cause inconvenience.
Inspect the Thermostat Setting
After ensuring the power supply is intact, the next step is to inspect the thermostat setting on your water heater.
First, locate the thermostat, usually found on the front or side of the unit. Check if the setting is too low; ideally, it should be set between 120°F and 140°F for best performance. If it’s below this range, simply adjust it upward.
Next, take note of any unusual fluctuations in temperature. If the water isn’t heating properly despite the thermostat being set correctly, it may indicate a malfunction.
Don’t forget to check for any sediment build-up around the thermostat, as this can affect its accuracy. If you encounter persistent issues, consider reaching out to a professional with over 25 years of industry experience to address the problem.
If you notice any issues, consider contacting a qualified technician to address the problem.
Examine the Circuit Breaker
Now that you’ve checked the thermostat setting, it’s time to examine the circuit breaker.
Start by ensuring the power supply to your water heater is intact, then look for any tripped breakers that might need resetting.
Finally, inspect the wiring connections to rule out any loose or damaged wires that could be causing the issue. Additionally, consider contacting a top-rated emergency plumber for professional assistance if the problem persists.
Check Power Supply
Sometimes, the simplest issues can be the most overlooked when troubleshooting a broken water heater.
Start by checking the power supply to guarantee your heater’s getting the energy it needs. Look for any blown fuses or tripped circuit breakers that could interrupt the flow of electricity.
If you notice that the circuit breaker is in the “off” position, simply switch it back on. Remember, it’s vital to verify that the breaker isn’t overloaded with other appliances.
If everything seems fine, but you still have no power, you may need to consult a licensed electrician.
Reset Tripped Breaker
If the power supply checks out but your water heater still isn’t functioning, it’s time to examine the circuit breaker for any issues. A tripped breaker can easily disrupt your water heater’s operation.
Here’s how to reset it:
- Locate your circuit breaker panel, usually found in a garage or basement.
- Look for the breaker switch labeled for your water heater; it might be in the “off” position or show a red indicator.
- Firmly flip the switch back to the “on” position.
- Wait a few minutes and check if your water heater starts working again.
If it trips again, it could indicate a deeper issue, so consider calling a professional for help.
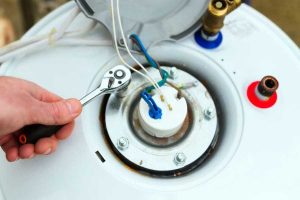
Inspect Wiring Connections
After checking the circuit breaker, it’s important to inspect the wiring connections to confirm everything is secure and functioning properly.
Start by turning off the power to your water heater for safety. Remove the access panel, and visually inspect the wiring for any signs of damage, such as fraying or burns.
Make sure all connections are tight and free from corrosion. If you find any loose wires, reconnect them firmly.
Additionally, check the terminals for any signs of overheating. If you’re unsure about any wiring issues, it’s best to consult a licensed professional.
At Fix It Fast Plumbing Heating & Air, we can help you resolve these issues efficiently and safely, making certain your water heater runs smoothly again.
Flush the Water Heater
Flushing your water heater is essential for maintaining its efficiency and extending its lifespan.
You’ll want to follow a few straightforward steps to get the job done right, and knowing how often to do this can make a big difference. Additionally, regular flushing can help ensure that your water heater remains up to 30% more efficient and provides hot water on demand, reducing energy costs over time.
Let’s explore the importance of flushing, the steps involved, and how frequently you should tackle this task.
Importance of Flushing
While many homeowners overlook the importance of maintaining their water heater, regular flushing is essential for peak performance and longevity.
Flushing removes sediment buildup that can lead to inefficiencies and costly repairs. Here are a few reasons why you should prioritize this task:
- Improves Efficiency: A clean tank heats water faster, saving you energy and money.
- Extends Lifespan: Regular flushing helps prevent corrosion and extends the life of your water heater.
- Enhances Water Quality: Flushing eliminates rust and sediment, providing cleaner, healthier water.
- Reduces Noise: Sediment buildup can cause rumbling noises; flushing reduces this, ensuring quieter operation.
Steps to Flush
To keep your water heater running efficiently, flushing it regularly is a straightforward process you can tackle yourself.
First, turn off the power to the unit and shut off the cold water supply.
Next, connect a garden hose to the drain valve at the bottom of the tank and run it to a nearby floor drain or outside.
Open the drain valve and let the water flow out until it runs clear, which helps remove sediment buildup.
While it’s draining, you can open the pressure relief valve to speed up the process.
Once done, close the drain valve, remove the hose, and refill the tank by turning the cold water supply back on.
Finally, restore power to your water heater.
Frequency Recommendations
Regularly flushing your water heater is essential for maintaining its efficiency and prolonging its lifespan.
By removing sediment buildup, you can keep your water heater running smoothly and efficiently.
To guarantee peak performance, follow these frequency recommendations:
- Every 6 months: For households with hard water, this helps prevent significant scale buildup.
- Annually: Most homes can benefit from a yearly flush to remove minor sediment.
- Before winter: If you live in colder climates, flushing before the season can enhance efficiency.
- After any repairs: If you’ve had maintenance or repairs done, flush the system to clear out any debris.
Look for Leaks
Before you plunge into fixing your broken water heater, it’s important to check for leaks that could be causing your issues.
Start by inspecting the area around the heater for any signs of water pooling or dampness. Pay attention to the connections, valves, and pipes. A small drip can lead to bigger problems down the line.
Next, look closely at the tank itself. If you notice rust or corrosion, that’s a red flag.
Don’t forget to check the pressure relief valve and drain valve; these are common leak points. If you find any leaks, it’s vital to address them before proceeding with other repairs.
Replace the Heating Elements
Once you’ve confirmed there are no leaks around your water heater, it’s time to tackle the heating elements. If you’re experiencing lukewarm water, worn-out heating elements might be the culprit.
Here’s how to replace them:
- Turn Off the Power: Safety first! Switch off the power to your water heater at the circuit breaker.
- Drain the Tank: Connect a hose to the drain valve and empty the tank to avoid spills.
- Remove the Access Panels: Unscrew the access panels on your water heater to expose the heating elements.
- Replace the Elements: Unscrew the old heating elements and replace them with new ones, making sure they’re properly secured.
Once you’ve completed these steps, restore power to the unit and check if it’s heating correctly.
If not, consider other issues or seek professional help.
Call a Professional if Needed
If you find that replacing the heating elements didn’t solve your water heater issues, it’s wise to call a professional.
Sometimes, the problem goes beyond simple repairs, and only an expert can identify the root cause. Ignoring persistent issues can lead to more significant damage and costly repairs down the line.
When you reach out to a professional, look for a team like Fix It Fast Plumbing Heating & Air. They’re available 24/7 and ready to tackle any water heater problem you throw their way.
Their licensed professionals are committed to quality and efficiency, ensuring your comfort and safety. Plus, they offer honest communication and flexible scheduling to fit your needs.
Don’t hesitate to seek help. A professional can save you time, money, and stress, leaving you with peace of mind knowing your water heater is in good hands.
Conclusion
In Fillmore, CA, tackling a broken water heater doesn’t have to be a headache. By following these seven easy fixes, you can often resolve the issue yourself. Did you know that about 75% of water heater problems stem from simple maintenance issues? By staying proactive, you can save time and money while ensuring a steady supply of hot water. If all else fails, don’t hesitate to call a professional for help—your comfort is worth it!